
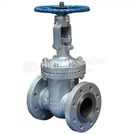


Hey there! As a gate valve supplier, I often get asked about how to replace the packing in a gate valve. It's a crucial maintenance task that can help keep your valve functioning smoothly and prevent leaks. In this blog post, I'll walk you through the process step by step.
Why Replace the Packing?
First off, let's talk about why you might need to replace the packing in a gate valve. Over time, the packing, which is used to seal the valve stem and prevent fluid leakage, can wear out due to factors like friction, temperature changes, and chemical exposure. When the packing deteriorates, you might notice leaks around the valve stem, which can lead to loss of fluid, environmental hazards, and even damage to the valve itself. So, replacing the packing at the right time is essential to maintain the valve's performance and safety.
Tools and Materials You'll Need
Before you start the packing replacement process, gather the following tools and materials:
- A set of wrenches (sizes may vary depending on the valve)
- A packing removal tool (or a flat - head screwdriver in a pinch)
- New packing material (make sure it's compatible with the fluid and operating conditions of your valve)
- Lubricant suitable for the packing material
- Safety gear, such as gloves and safety glasses
Step 1: Prepare the Valve
The first thing you need to do is shut off the flow of fluid through the valve. This is a critical safety step to prevent any accidents during the packing replacement. Then, relieve the pressure in the valve and the pipeline. You can do this by opening any drain valves or bleeders in the system. Make sure to follow all safety procedures and guidelines when depressurizing the system.
Step 2: Remove the Old Packing
Once the valve is depressurized, locate the packing gland. The packing gland is usually a nut or a set of bolts that hold the packing in place around the valve stem. Use the appropriate wrench to loosen and remove the packing gland bolts or nuts. Be careful not to drop the bolts or nuts, as they can be easily lost.
After removing the packing gland, you can use the packing removal tool or a flat - head screwdriver to carefully pry out the old packing. Start from the top layer and work your way down, layer by layer. Be gentle to avoid damaging the valve stem or the packing chamber. As you remove the old packing, inspect it for signs of wear, damage, or contamination. This can give you an idea of why the packing failed and help you choose the right replacement packing.
Step 3: Clean the Packing Chamber
Once all the old packing has been removed, it's time to clean the packing chamber. Use a clean cloth or a brush to remove any debris, dirt, or old packing residue from the chamber. Make sure the chamber is completely clean and dry before installing the new packing. A dirty packing chamber can prevent the new packing from sealing properly and may lead to premature failure.
Step 4: Select and Prepare the New Packing
As a gate valve supplier, I can tell you that choosing the right packing material is crucial. Consider factors such as the type of fluid the valve is handling, the operating temperature and pressure, and the valve's design. For example, if you're dealing with high - temperature applications, you might need a packing material with good heat resistance. If the fluid is corrosive, a corrosion - resistant packing would be a better choice.
Once you've selected the right packing material, cut it to the appropriate length. The packing should fit snugly around the valve stem without being too tight or too loose. You can use a lubricant suitable for the packing material to make installation easier and improve the packing's sealing performance. Apply a thin layer of lubricant to the packing rings.
Step 5: Install the New Packing
Start by inserting the first packing ring into the packing chamber. Make sure it sits evenly around the valve stem. Use a packing installer or a flat - head screwdriver to gently push the ring down into the chamber. Continue adding packing rings one by one, making sure each ring is properly seated and aligned. You may need to use the packing installer to compress the rings slightly to ensure a tight fit.
It's important to stack the packing rings correctly. Some packing materials come with specific installation instructions regarding the orientation and number of rings. Follow these instructions carefully to achieve the best sealing results.


Step 6: Reinstall the Packing Gland
Once all the new packing has been installed, carefully reinstall the packing gland. Tighten the bolts or nuts evenly, but don't over - tighten them. Over - tightening can damage the packing and the valve stem, and may also cause the packing to extrude or wear out quickly. A good rule of thumb is to tighten the gland just enough to compress the packing slightly and start to form a seal.
Step 7: Test the Valve
After reinstalling the packing gland, it's time to test the valve. Slowly open the valve and check for any leaks around the valve stem. If you notice any leaks, you may need to adjust the packing gland tightening. You can do this by loosening the gland slightly and then retightening it in small increments until the leak stops.
Keep in mind that it may take a few cycles of opening and closing the valve for the packing to fully seat and form a proper seal. So, don't be too hasty in making adjustments.
Different Types of Gate Valves
There are several types of gate valves, each with its own unique features and packing replacement requirements. For example, the Non-rising Stem Gate Valve has a stem that doesn't rise as the valve is opened or closed. This design can be more suitable for applications where space is limited. When replacing the packing in a non - rising stem gate valve, you may need to pay extra attention to the alignment of the packing around the stem.
The Forged Gate Valve is known for its high strength and durability. It's often used in high - pressure and high - temperature applications. When working on a forged gate valve, make sure to use packing materials that can withstand these harsh conditions.
The Carbon Steel Gate Valve is a popular choice due to its affordability and corrosion resistance. When replacing the packing in a carbon steel gate valve, consider the type of fluid it's handling. If the fluid is corrosive, you may need to choose a packing material with good chemical resistance.
Conclusion
Replacing the packing in a gate valve is a relatively straightforward process, but it requires attention to detail and proper safety precautions. By following the steps outlined in this blog post, you can ensure that your gate valve continues to operate smoothly and efficiently.
If you have any questions about gate valves or need help choosing the right packing material for your application, don't hesitate to reach out. As a gate valve supplier, I'm here to assist you with all your valve - related needs. Whether you're looking for a new gate valve or need advice on maintenance, we can provide you with the best solutions. Contact us to start a procurement discussion and find the perfect gate valve for your project.
References
- Valve Handbook: A Guide to Valve Selection, Installation, and Maintenance
- Industrial Valve Maintenance Manuals